Labelling
How to log in
Access to the Labelling module is via your Kafoodle Kitchen account.
Once you have logged into your Kafoodle account, navigate to the recipes screen either from the tile on the homepage or from the quick tile at the top of any other screen. Next to each of your listed recipes you will see a labelling icon ‘luggage tag’ under ‘Controls’.

Click on the ‘luggage tag’ and the labelling screen will open in a new tab in your browser for that particular recipe, in this example – Chicken Caesar Salad.

In the right hand panel. you will see many different label templates. Scroll down to view all available templates for printing.
You can use the left hand panel to customise your labels and filter the available templates. Scroll down to see all available options and filters.
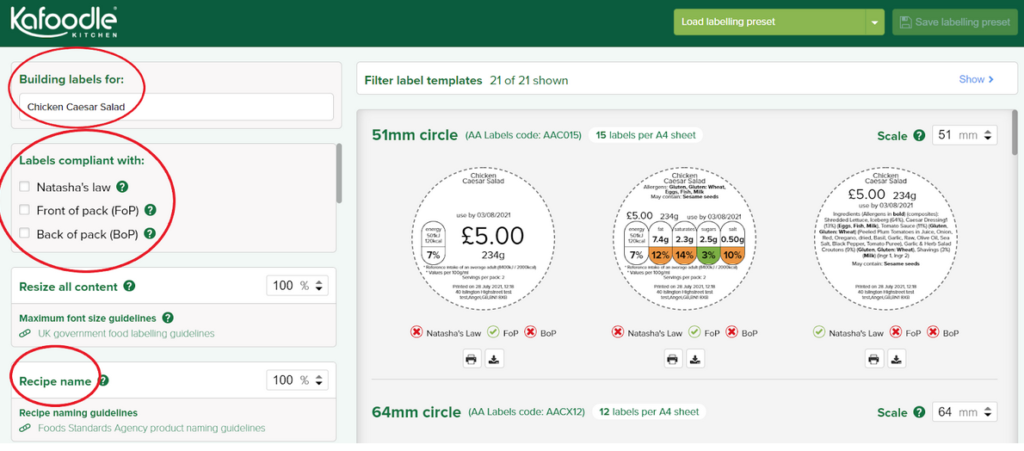
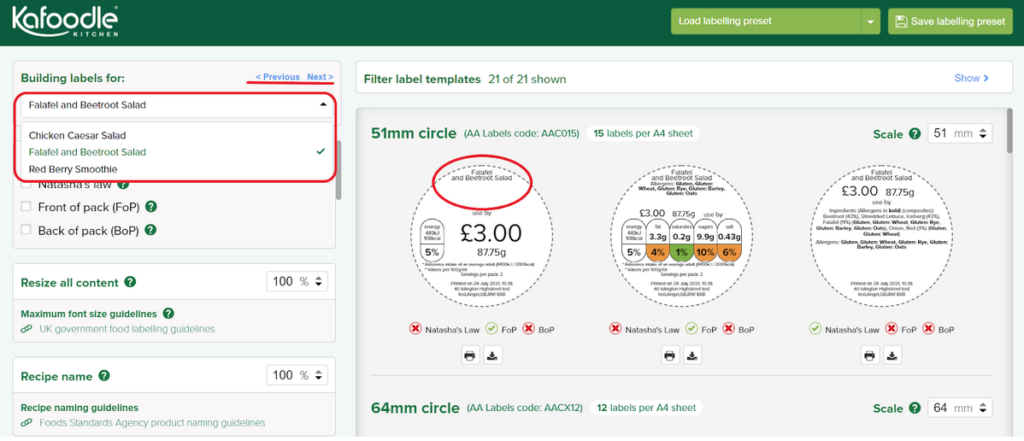
Building Labels for
You will see the name of the recipe your labels will be created for.
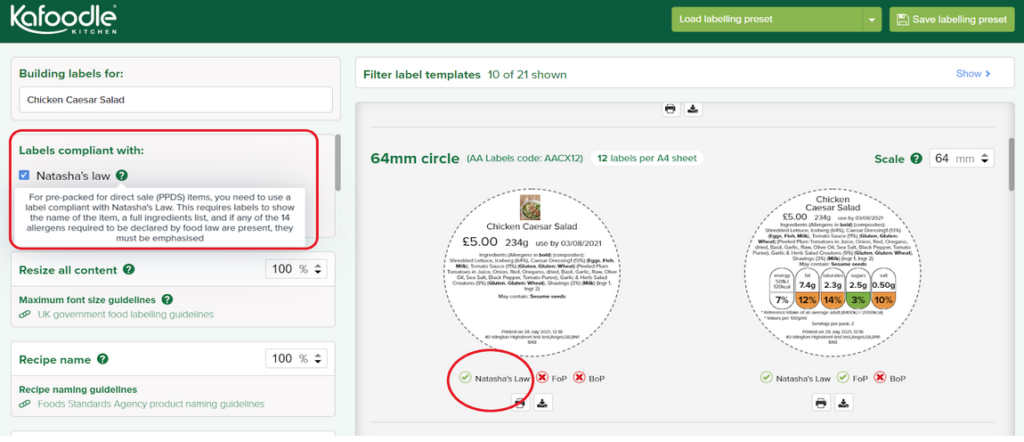
Labels compliant with
You can choose any one or more options to create a compliant label. For example, when you select both Natasha’s Law and Front of Pack, you will filter to just the relevant label templates, appearing with a green tick on the right of your screen.
Useful information appears for each of these options when you hover over the ‘tooltip icon’.
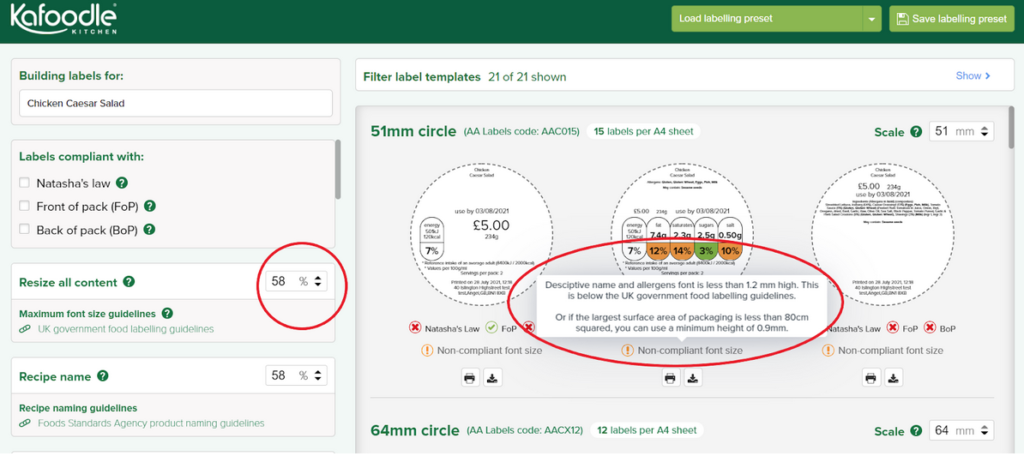
Resize all content
You can resize text using this option to fit all information in a label. Click on the down arrow or type in a number to adjust the font size as shown below. This will reduce the size of all text fields on labels.
If the font size is adjusted below the minimum limit mandated by the UK food labelling guidelines, a warning message will appear below each label.
Recipe name
To resize only the recipe name text in labels, click the down arrow next to 100%.
There is useful information when you hover over the ‘recipe name’ tooltip icon ‘?’.
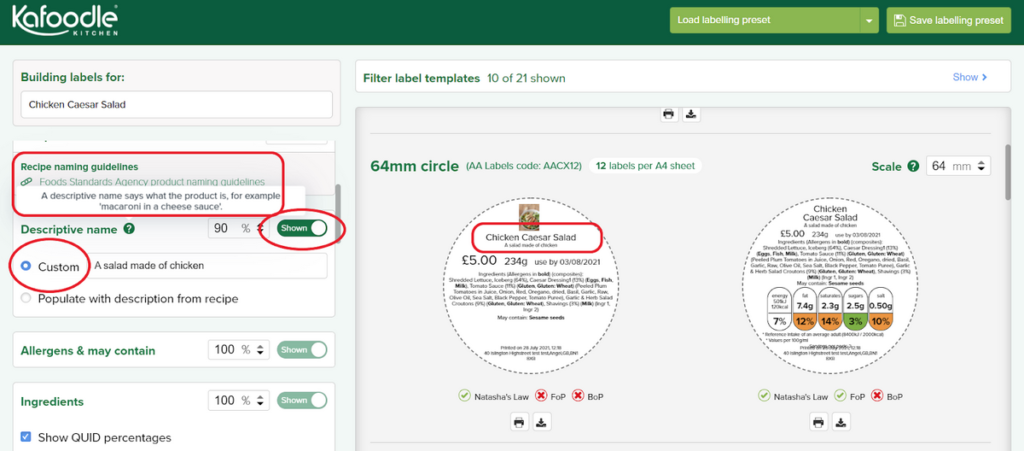
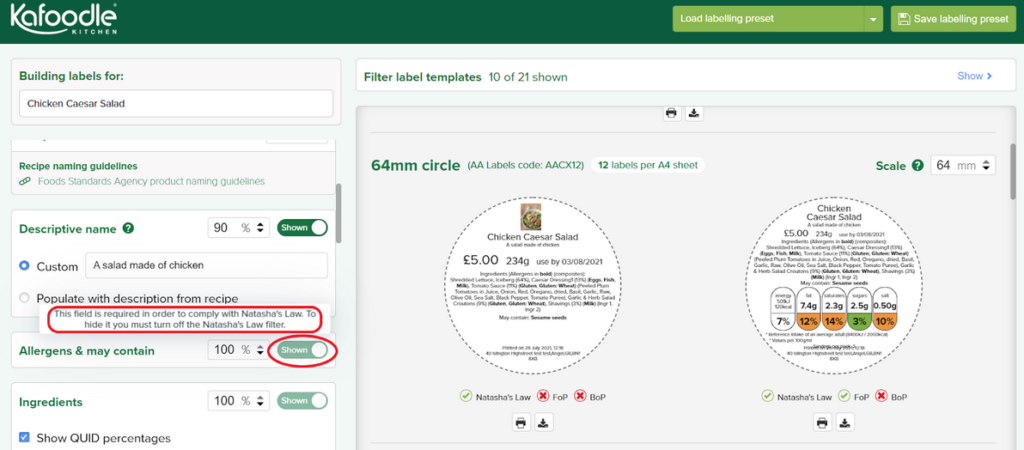
Descriptive name
You can click the ‘shown/hidden’ button to add or remove the descriptive name from the labels.
You can add a custom descriptive name by typing in the text box. Or you can choose the other option to populate this field from the description field on your recipe. The descriptive name will appear below the recipe name in labels as shown below.
To resize only the descriptive name text in labels, click the down arrow next to 100%.
There is useful information when you hover over the ‘descriptive name’ tooltip icon ‘?’.
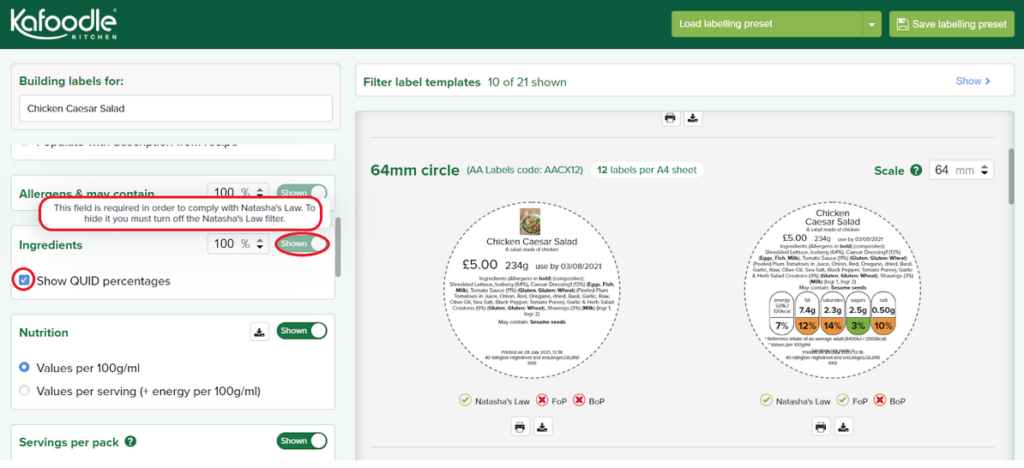
Food Allergens & may contain
You can click the ‘shown/hidden’ button to add or remove the allergens and may contain fields from labels.
You will notice that the ‘shown/hidden’ button is disabled if you choose Natasha’s Law from the ‘labels compliant with’ filters at the top. This is because full food allergen information is mandatory on Prepacked for Direct Sale (PPDS) labels to be compliant with Natasha’s Law.
To resize only these fields, click the down arrow next to 100%.
Ingredients & QUID percentages
You can click the ‘shown/hidden’ button to add or remove the ingredients list from labels. You will notice that the ‘shown/hidden’ button is disabled if you choose Natasha’s Law from the ‘labels compliant with’ filters at the top. This is because full ingredients information is mandatory on Prepacked for Direct Sale (PPDS) labels to be compliant with Natasha’s Law.
The full ingredients list is displayed (with allergens) in descending order of percentage used or QUID (Quantitative ingredients declaration). You may choose to hide the QUID percentage by de-selecting the checkbox. For further information on when it is a requirement to use QUID please see here.
To resize only the ingredients list, click the down arrow next to 100%.
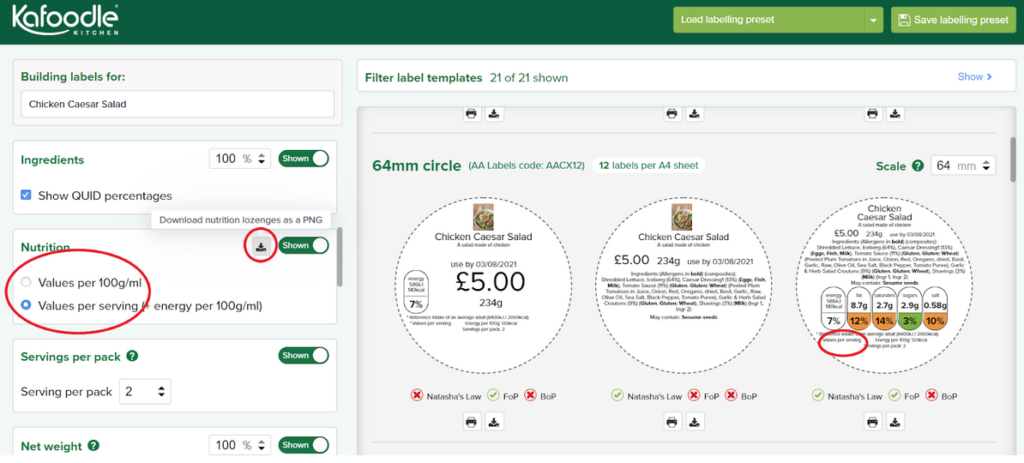
Nutrition
You can click the ‘shown/hidden’ button to add or remove the nutrition information from labels. You may choose values per 100g/ml or value per serving (+energy per 100g/ml) by selecting the appropriate checkbox.
You will notice that the ‘shown/hidden’ button is disabled if you choose Front of Pack or Back of Pack from the ‘labels compliant with’ filters at the top. This is because nutrition information is mandatory for such labels to be compliant with UK labelling guidelines.
The download button allows you to save the nutrition lozenge (with the traffic lights) as a PNG image file.
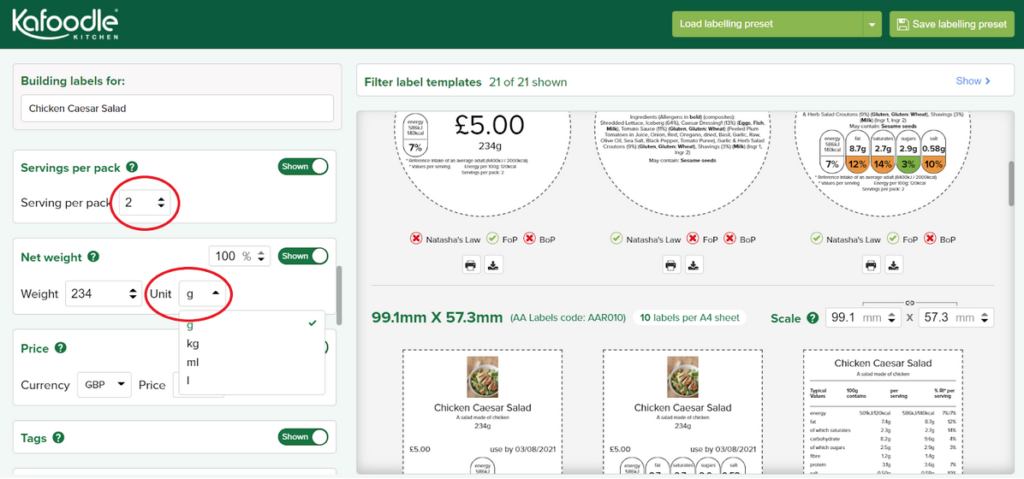
Servings per pack and Net Weight
Number of servings displayed on the labels are the same as what is specified in the recipe by default. You may override this value if needed by using the up/down arrow. Be sure to amend the number down to ‘1’ if you are labelling a package which contains just 1 serving otherwise the nutrition data on the label will be for the full quantity that the recipe makes.
Net weight displayed on labels is the same as what is specified in the recipe by default. If you have changed the number of servings, the net weight would be recalculated automatically. However, you can override this manually if required. You may choose a unit of measure other than the default by selecting from the drop down list. The weight will be recalculated automatically to align with the selected unit.
You can click the ‘shown/hidden’ button to add or remove these fields from labels. You will notice that the ‘shown/hidden’ button is disabled if you choose Front of Pack or Back of Pack from the ‘labels compliant with’ filters at the top. This is because servings and net weight information is mandatory for such labels to be compliant with UK labelling guidelines.
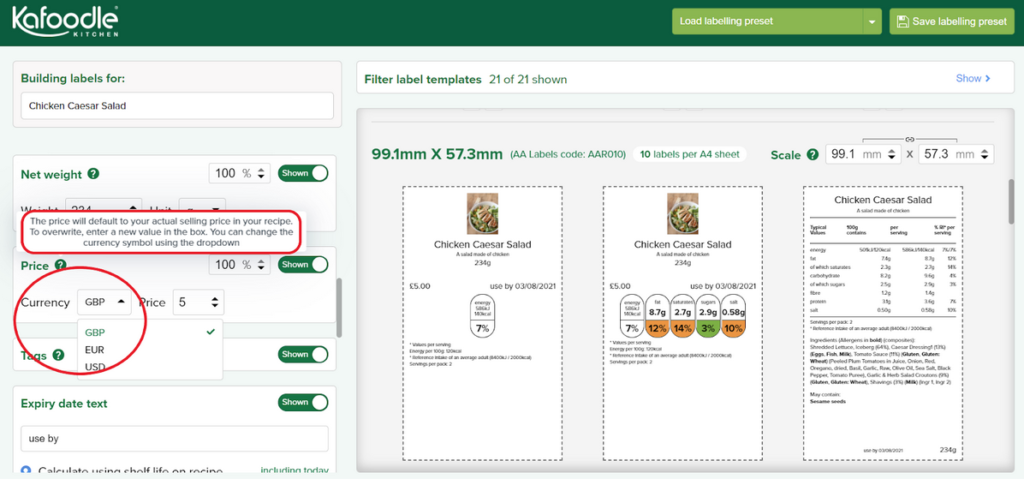
Price
Price displayed on labels is the same as specified in the ‘actual price’ field in the recipe, if you have used this field. You can override this by adding a new value (up to 2 decimals) in the text box or by using the up/down arrow. You may also change the default currency symbol by selecting a value from the drop-down list.
You can click the ‘shown/hidden’ button to add or remove price from labels.
You may also resize the text by changing the default value of 100%.
Tags
You can click the ‘shown/hidden’ button to add or remove any recipe tags (such as suitable for vegetarian, suitable for vegan, suitable for halal or suitable for Kosher) which you may have added to a recipe. Please note, these tags are only available on some of the bigger label templates.
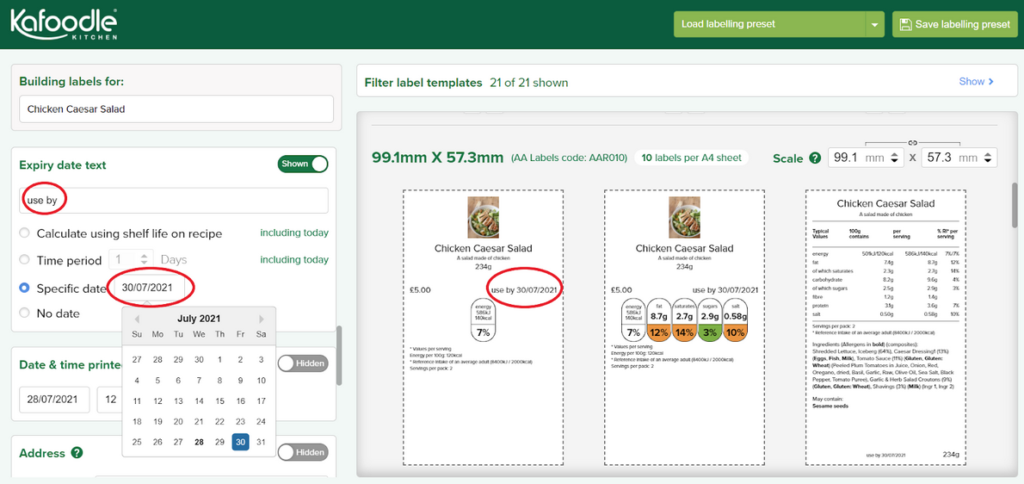
Expiry date text
You can add an Expiry’ date to labels. Or you can even change the field name by clicking inside the text box and rename as needed e.g. best before, expiry date or just consume on day of purchase. You can choose one of the three options to specify and display a correct date.
- Calculate using shelf life on recipe – a date will be automatically generated from the recipe shelf life field in a recipe if it has been utilsed and displayed on labels
- Time period – assign a time period by clicking up/down arrows and a date will be automatically generated and displayed on labels
- Specific date – assign a date from the pop-up calendar to display on labels
You can also select the ‘No date’ option as per your requirement. This may be particularly useful if you have chosen to type ‘Best Before’ in the text section.
You can click the ‘shown/hidden’ button to add or remove the expiry date field from labels altogether.
Date & time printed
Date and time of printing of labels is auto-populated but you can override this as required.
You can click the ‘shown/hidden’ button to add or remove the date & timestamp from labels.
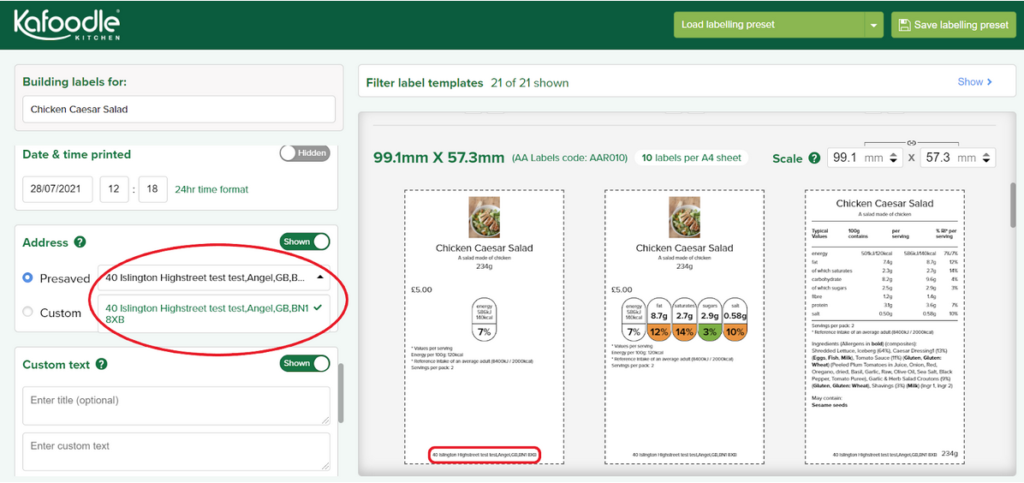
Address
The default address will be that of the site you are working in. You can choose an alternative address which is already saved for your business from the dropdown list to print on labels. Or you may add another address by clicking in the custom text box.
You can click the ‘shown/hidden’ button to add or remove the address from labels.
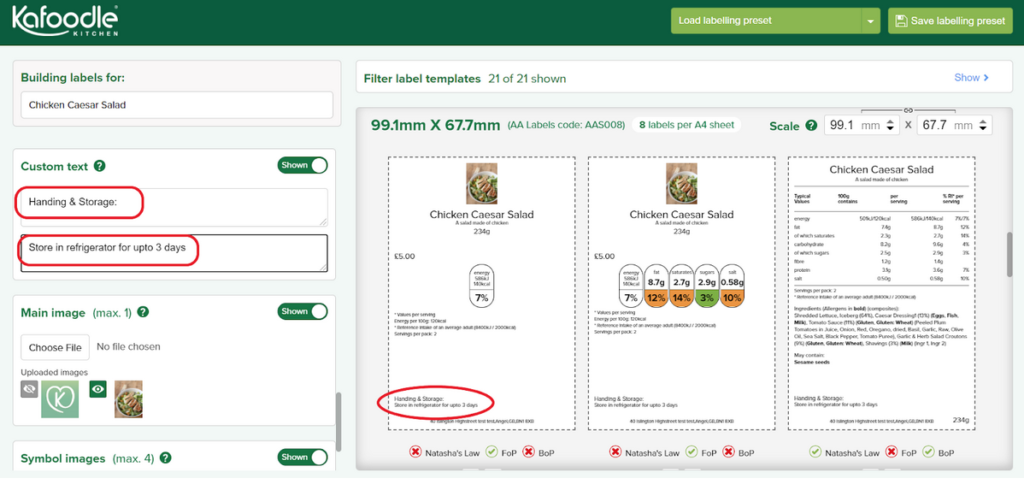
Custom text
You can use a custom text field to add any other information on labels e.g. storage or heating instructions, Batch codes etc. You can add an optional title for this information by clicking in the title text box and use the custom text box to add the full information.
This option can only be used with rectangular label templates and the text will be displayed in the lower half of labels.
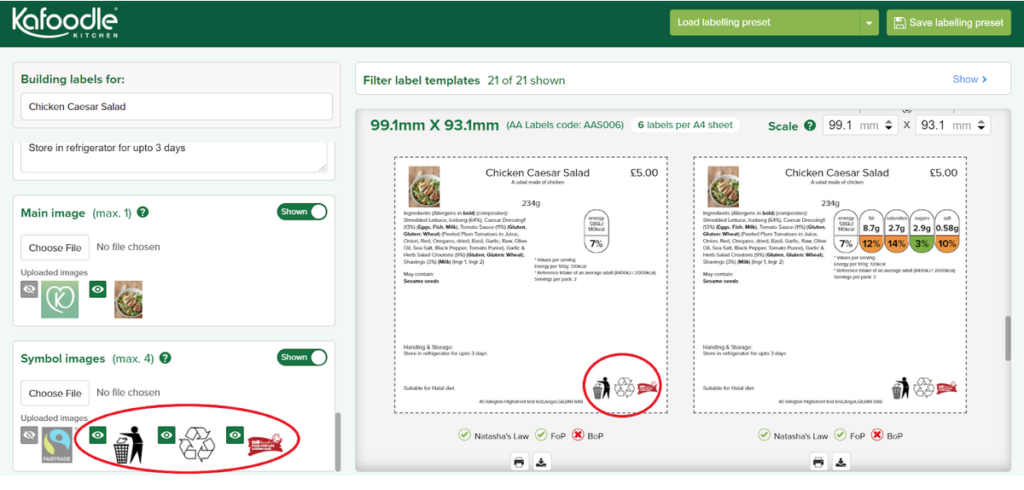
Main image
If you have added an image to your recipe it will be visible in this section for you to add to labels. You can choose to display this image by clicking on the eye icon.
You can upload any other custom image by clicking on the choose file button. Once uploaded it will be available to display on labels. Please note, not all templates can accommodate an image. If there is no image available on your selected label please choose an alternative.

Symbol images
You can display up to four symbol images on labels by clicking on the eye icon. Be aware these symbols are only available on the larger templates.
You can also upload one custom image by clicking on choose file option. Once uploaded you can select it to display on labels.
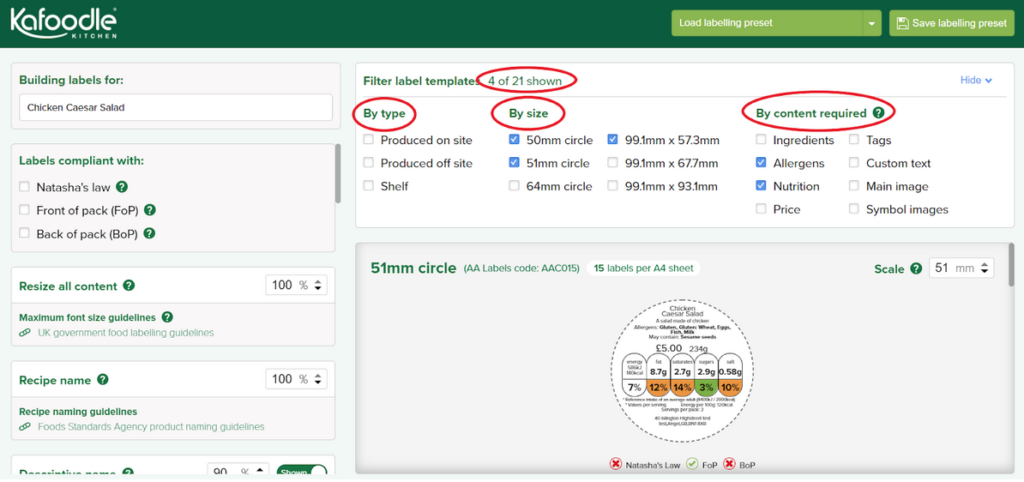
Filter label templates
You can filter all label templates by any of these categories:
- By size: you can filter labels by size/shape
- By type: this filter can help you find labels that are designed for items produced on site or off site (e.g. at a CPU). There are also shelf labels that are designed to appear on shelves or fridges.
- By content required: you can select all fields that you want to display on a label here and any labels that do not meet this selection criterion will be filtered out. For example, if you chose ‘allergens’ in this filter – only 10 out of 21 label templates will be displayed on the screen here.
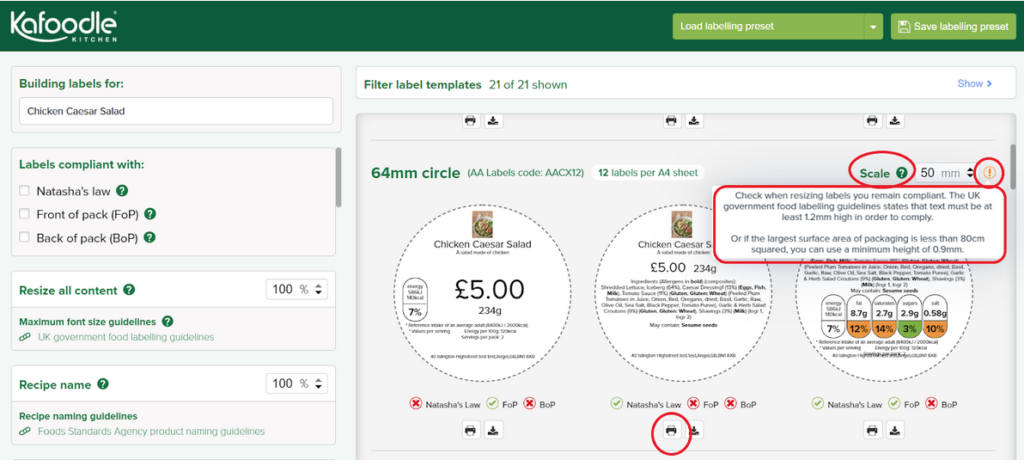
Scale & print options
You can use the scale feature to resize labels and print appropriately. Use the up/down arrows next to the scale text box and click on the print button for a preview.
While resizing labels, ensure that labels are in compliance with the labelling requirements that mandate a minimum text size. You should hover over the orange information ‘i’ icon to read the exact specifications.
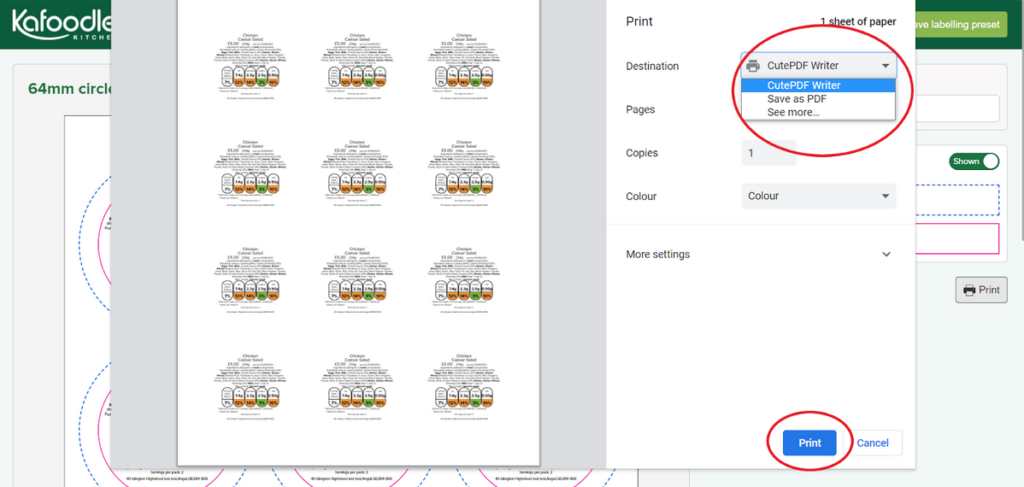
The label preview screen will open in a new tab in your browser and you should see the original size versus scaled size for comparison.
You may also hide the guide lines from view by clicking on the ‘shown/hidden’ button.
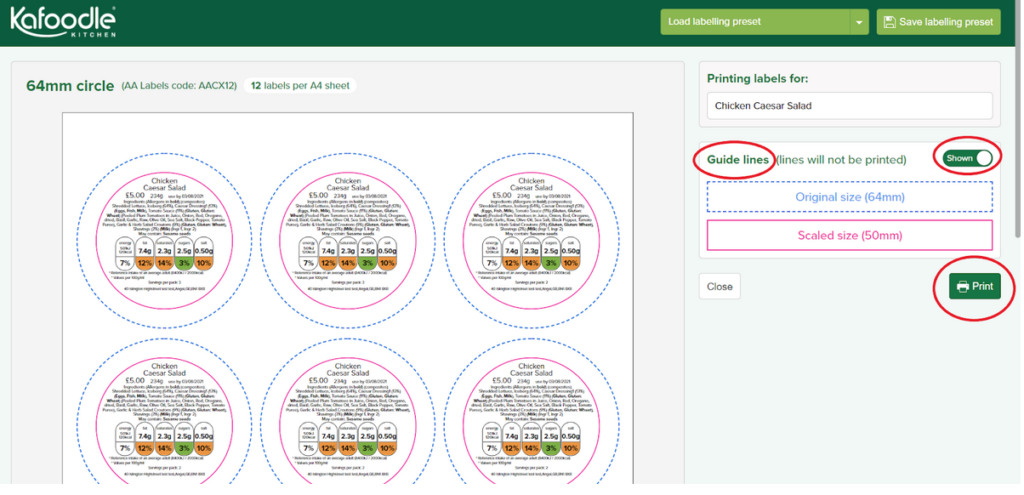
Once satisfied with the label preview, you should click the print button and select your printer from dropdown list to generate labels.
Labelling Presets
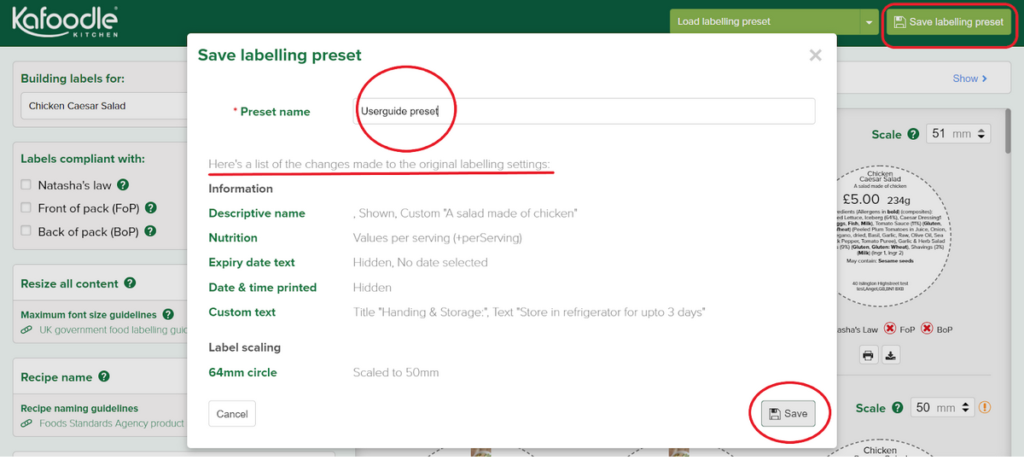
‘Save labelling preset’ feature allows for your specific selections and settings to be saved for use the next time. After you have customised all label settings to generate appropriate labels, click ‘Save labelling preset’ button at the top right corner of the screen. A pop-up window will appear where you should specify a name for this preset and review the settings list/changes and click save.
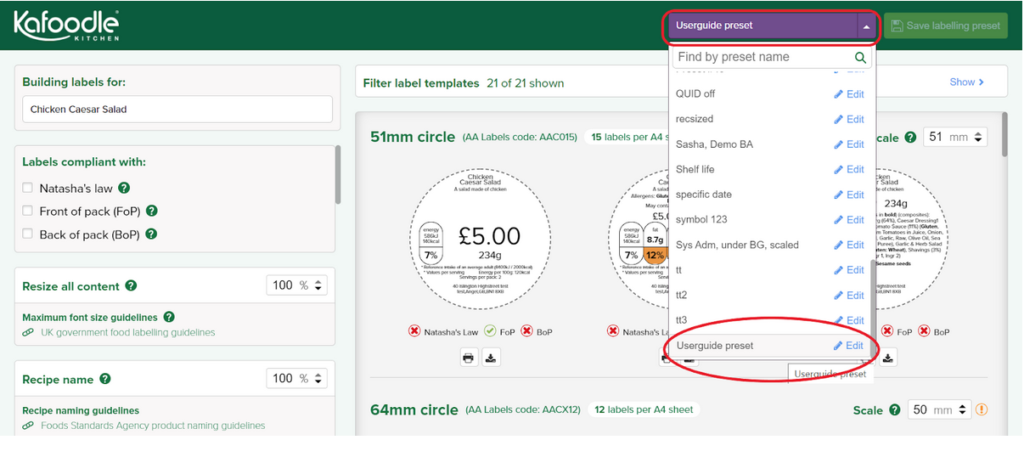
Next time, when you log in to the labelling module, you should see this preset by clicking on the dropdown list next to the ‘Load labelling preset’ button. Once you select this preset to load, all default settings will change to your custom settings.
You may also edit the preset by clicking on the edit button in the dropdown list. A pop-up window will appear where you can edit the name and/or delete this preset.
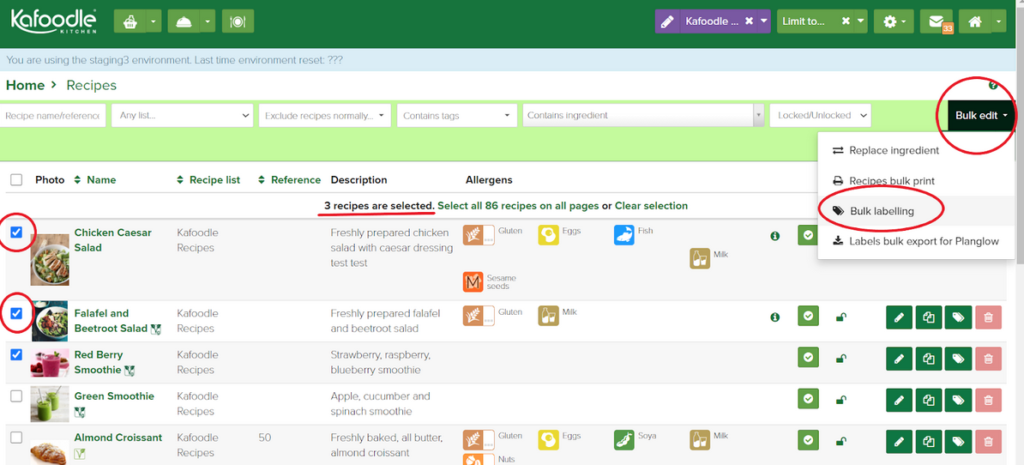
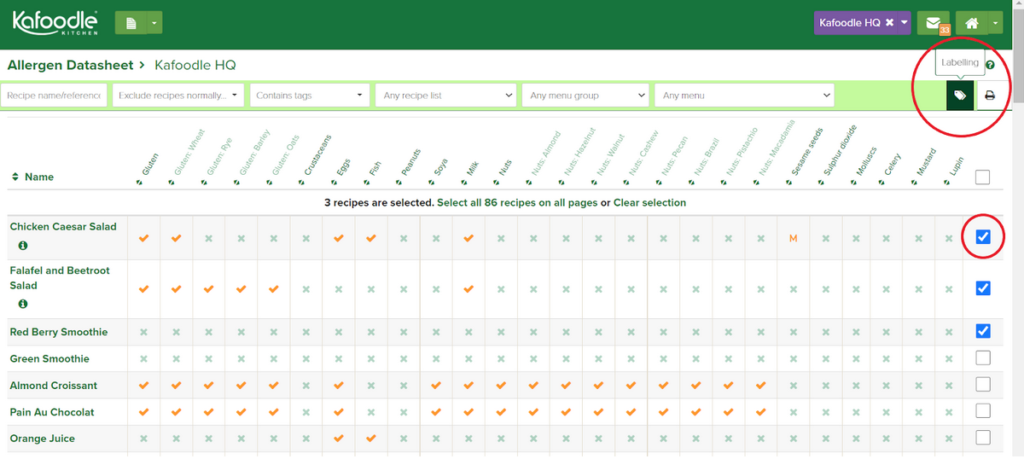
Bulk labelling
This feature enables you to create/review labels for more than 1 recipe from the same screen. On the recipe screen, select recipes by clicking on the checkbox next to the image. Then click on the dropdown next to Bulk edit and select ‘Bulk labelling’ from the dropdown.
The labelling screen will open in a new tab in your browser. You should see the list of all recipes in the dropdown under ‘Building labels for’ option. You can also click on previous/next buttons to move between recipe labels.
Please note when printing in bulk not all features may be available. Some aspects of presets may also be disabled if they are not applicable to all labels.
Labelling from Datasheets
If you are a staff member with access to datasheets only then you can still print labels as shown below. Select the recipe names by selecting the checkboxes then click the ‘luggage tag’ in the control panel. The labelling screen will open in a new tab in your browser to generate labels.
Troubleshooting
If for some reason you are having issues with printing labels there are a few things you can check;
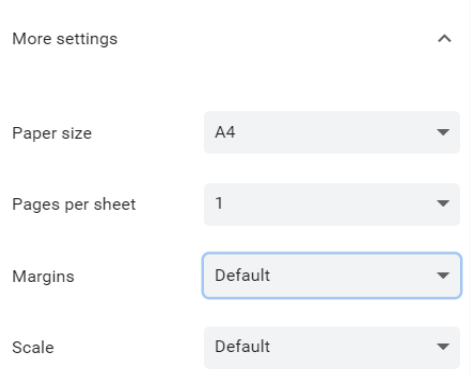
- Check the settings on your printer and ensure the margins and scale are set to default or 100%. Paper size should also be A4.
- Paper should be aligned correctly inside the printer as every mm will affect the alignment of the print.
- If printing to A4 sheets, we recommend using labels from the AA labels website as these have been tested for alignment when printing from Kafoodle.